Combine Onboarding Guide
Once Combine is installed in your account you are ready to onboard into the Combine sandbox environment!
User Account Credentials
Each Combine user will be provided with a credential package (usually via email.) The credential package is bundled as a .zip file and is usually downloaded using a temporary link in the email. For security reasons this link will expire after eight hours.
NOTE: In some cases your Combine administrator will provide the credential packages to you via other means depending on your organization's security requirements.
NOTE: In some cases your organization's email security solution might quarantine or reject our the Combine email address sending the credential packages. You may whitelist the following Domain/Public IP Addresses to ensure delivery:
Email Domain: combine-tap.io

Public IP Addresses:

54.240.47.207
54.240.47.208
Once you have your User Account Credentials you are ready to install your Combine User Certificate. (These steps are also summarized in the README.txt.)
Combine Dashboard Access
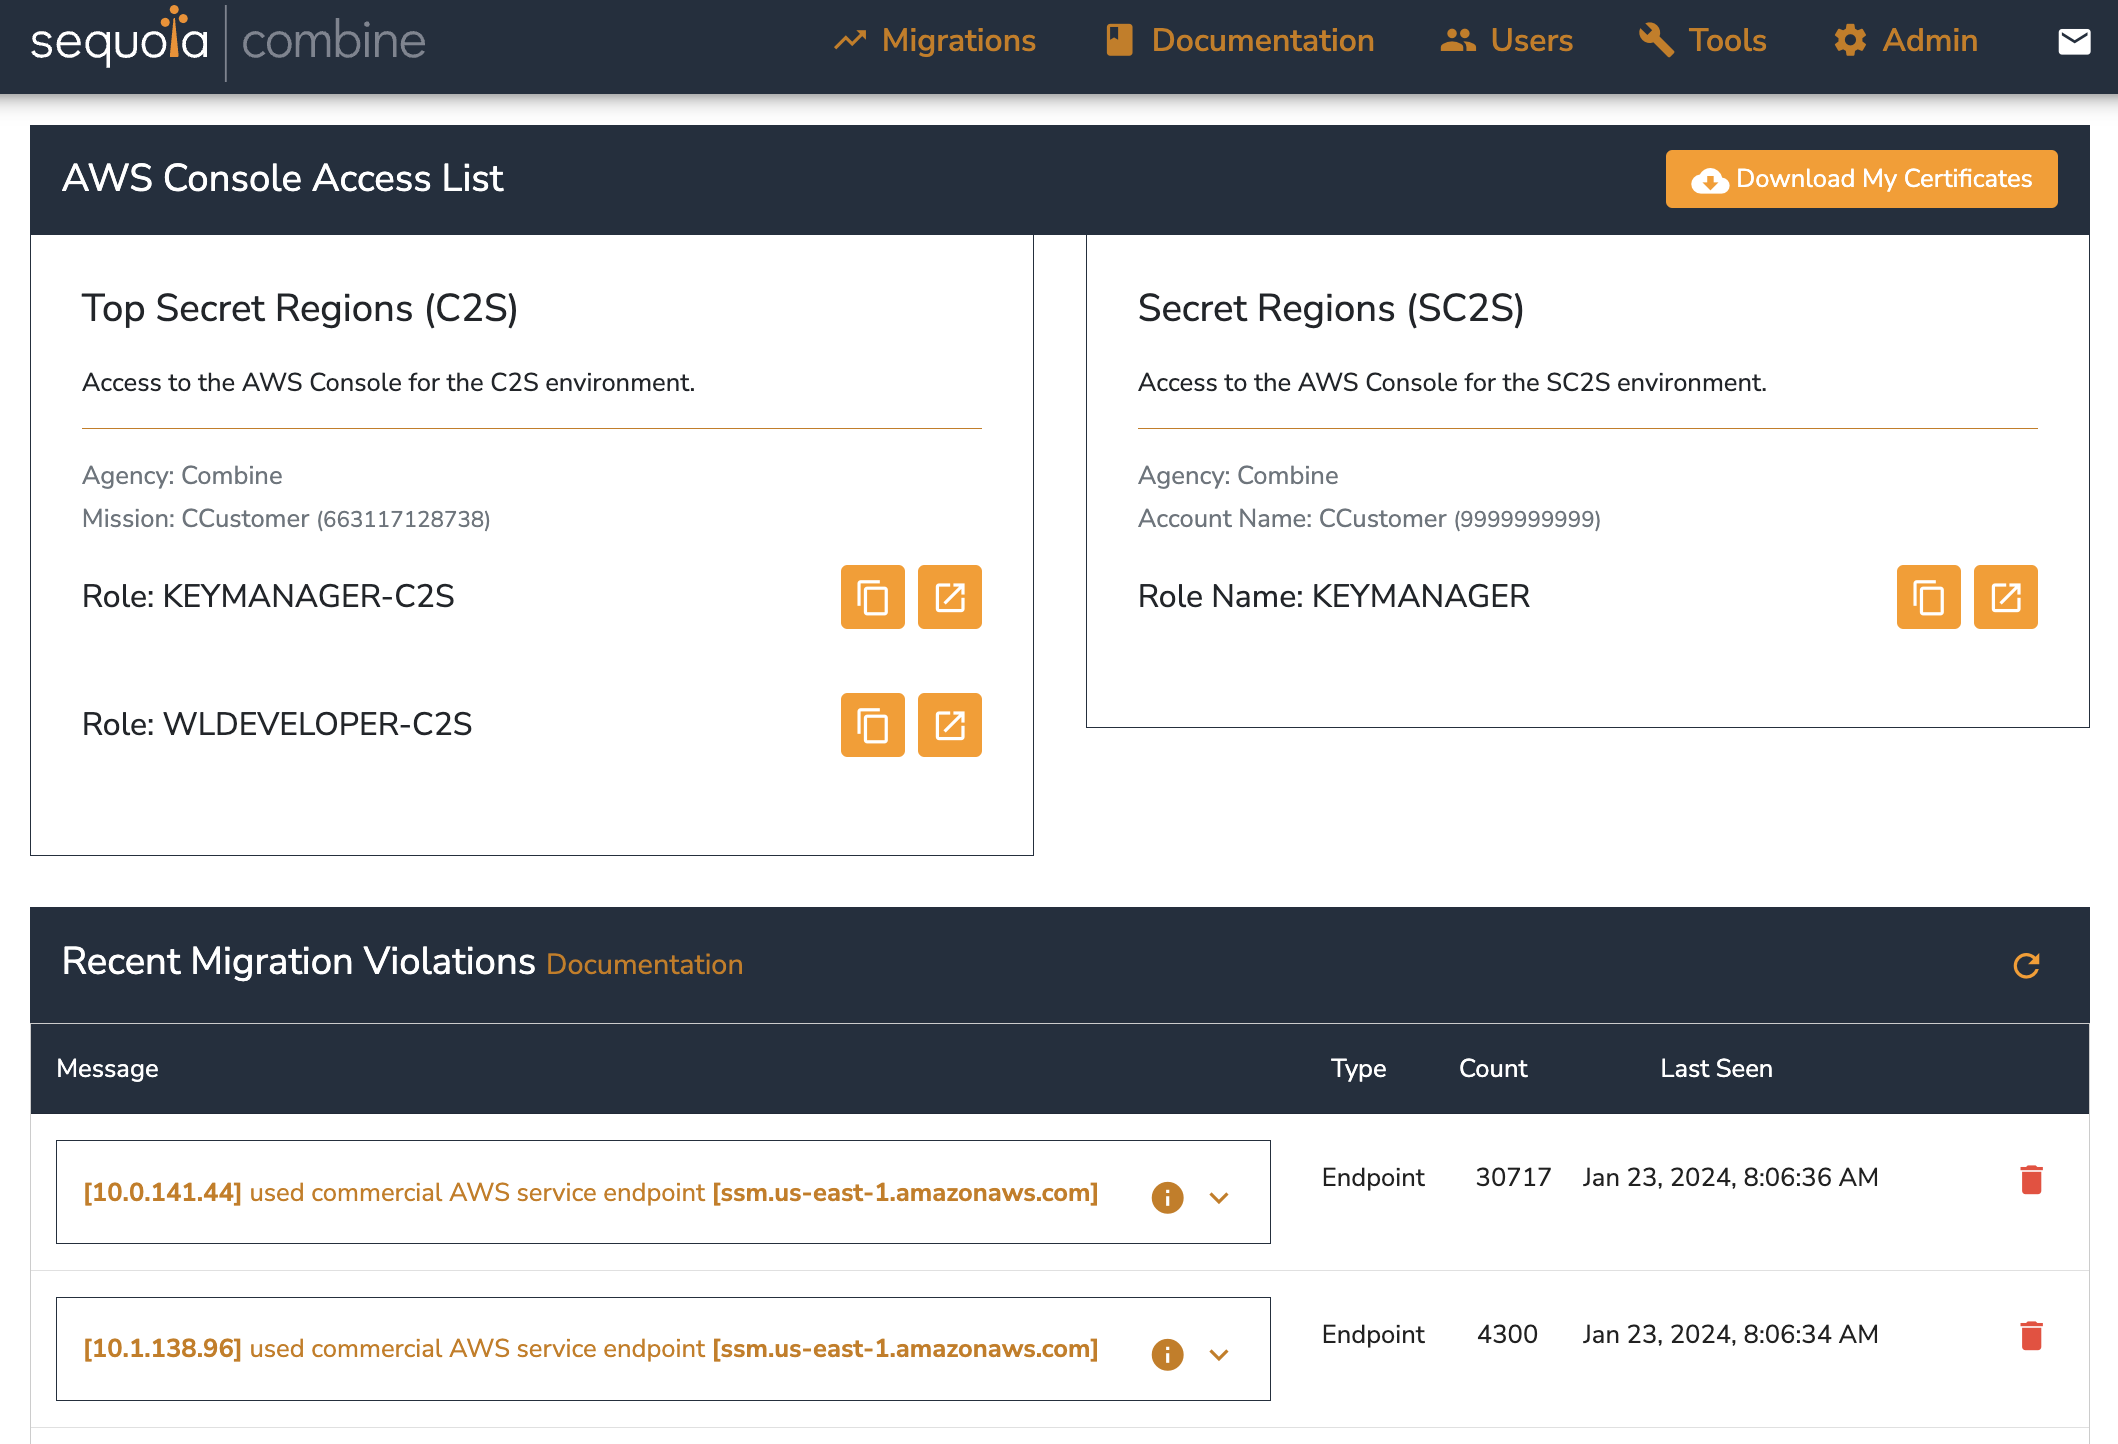
The Combine Dashboard is where you will manage your user accounts, authenticate to the AWS Console of the AWS Account that is hosting Combine, and see what Combine Alert Events have been reported. It will look something like this:
Each Combine deployment creates a private Certificate Authority unique to you that emulates the production environment's private Certificate Authority. You will use a client certificate issued from Combine's Certificate Authority to access the Combine Dashboard (which is common practice in many production environments.)
To access the Combine Dashboard, you will need to install:
- Combine Trust Chain - This is (usually) just the Public Certificate of the Certificate Authority. (We also provide the Public Certificate of the Certificate Authority Signer in case it is also needed.) This is available in your Credential Package at
certificates/ca.cert.pemorcertificates/ca.cert.derdepending on the file format you prefer. - Personal Certificate - This is the Public Certificate and Private Key of a Certificate issued to you by the Certificate Authority. This is available in your Credential Package at
certificates/<username>.p12.
See the steps below to install these into the Chrome Browser.
Certificate Installation - Windows
-
Install the Combine CA Public Certificate file (
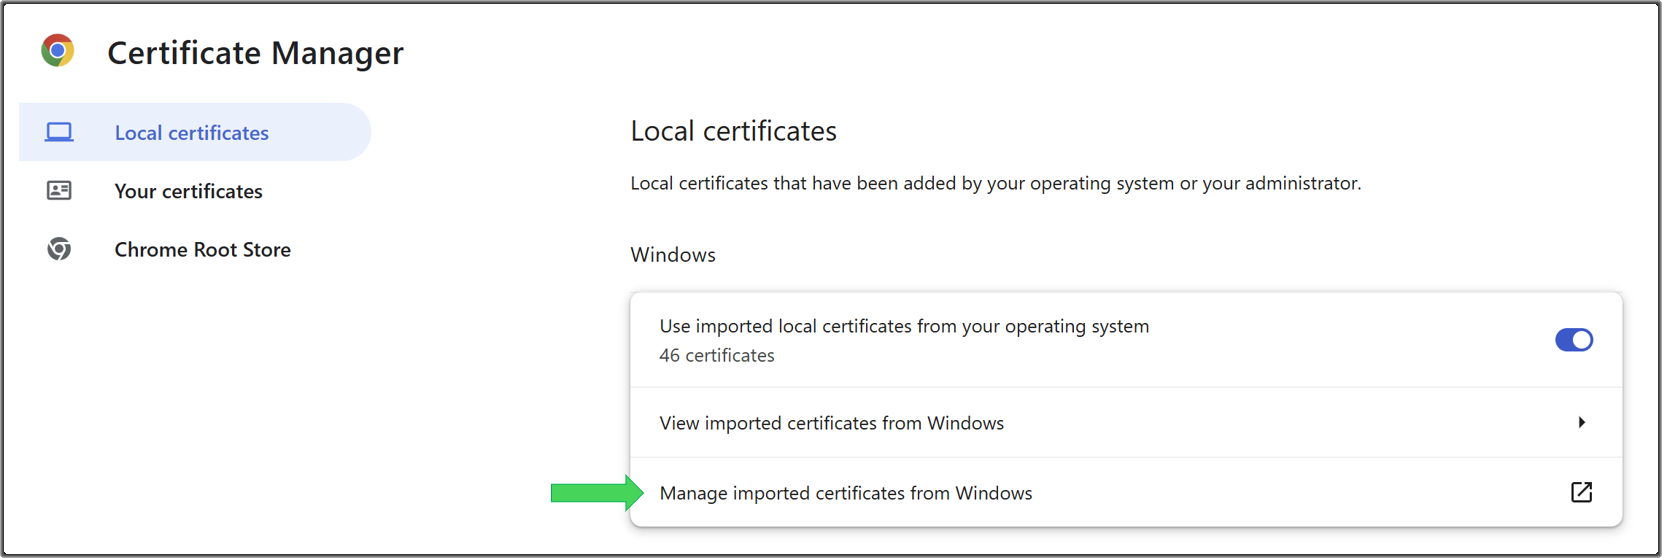
/certificates/ca.cert.pemin your Credential Package.) On Chrome, navigate to Settings -> Privacy and security -> Security -> Manage certificates. -
In the Chrome Tab that opens, click Manage imported certificates from Windows.
-
In the Certificates window, click on the Trusted Root Certification Authorities tab.
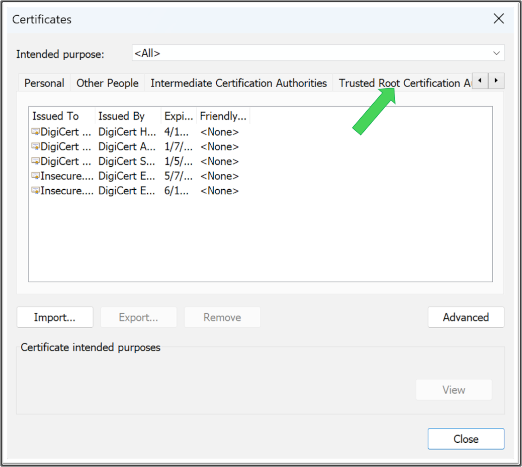
- Tip: you can use the right/left arrows highlighted below to navigate to the appropriate certificate store.
-
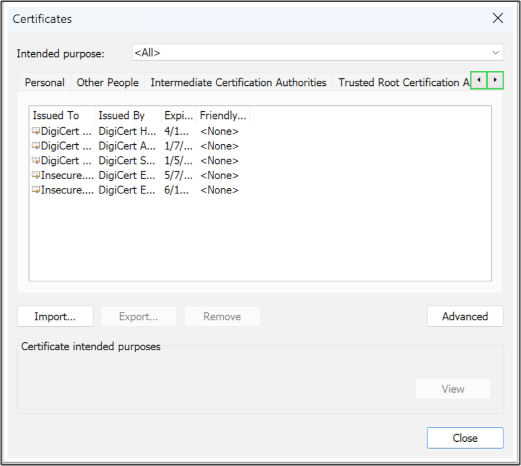
Click Import and follow the prompts to install the
ca.cert.pemfile into the Trusted Root Certification Authorities store.- NOTE: When browsing for the
ca.cert.pemfile you may need to adjust the file extension filter in the file dialog so you can see.pemfiles.
If the import is successful you will see an entry for
Combine CA - <your company name>in the list of certificates. - NOTE: When browsing for the
-
Install your Personal Certificate. Double-click on your Personal Certificate (
certificates/<username>.p12in your Credential Package.) You will be prompted to enter the Personal Certificate password (certificates/<username>_password.txtin your Credential Package.) -
Confirm the import of your Personal Certificate by entering your Windows system password if prompted.
If you have installed the certificates successfully, browse to the URL of your Combine Dasboard (see tap.txt in your Credential Package.) If the Combine Dashboard loads successfuly, then your Personal Certificate installation was successful!
Certificate Installation - MacOS
-
Install the Combine CA Public Certificate file (
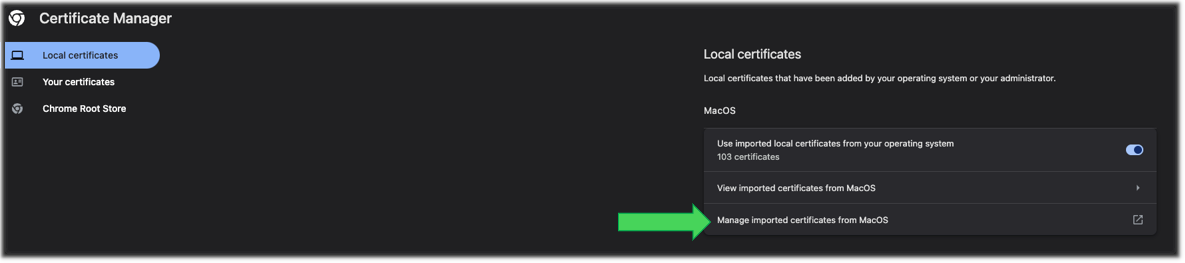
/certificates/ca.cert.pemin your Credential Package.) On Chrome, navigate to Settings -> Privacy and security -> Security -> Manage certificates. -
In the new Chrome tab that appears, click Manage imported certificates from MacOS.
-
When prompted, enter your MacOS system password.
-
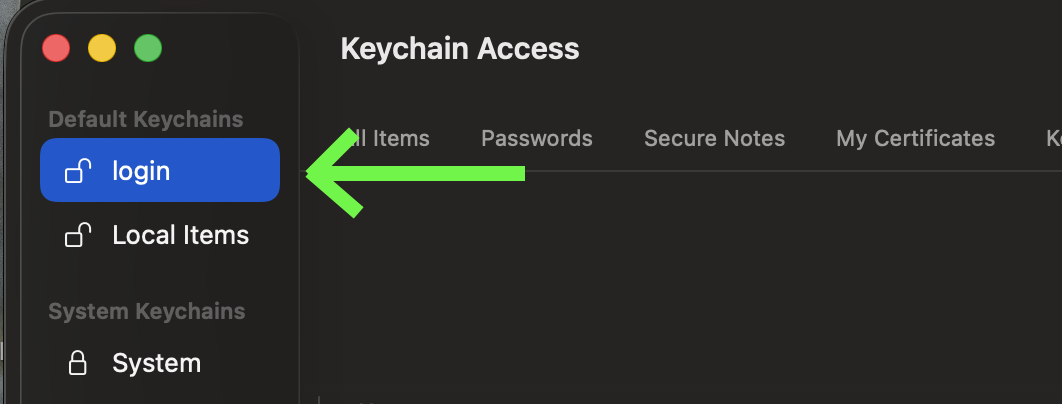
Locate Login Keychains menu and click Login.
- NOTE: Do not choose System Roots
-
Import the
certificates/ca.cert.pemfile by dragging it from your Credential Package folder to the Login keychain dialog. -
Confirm import by entering your MacOS system password.
If the import is successful you will see an entry for
Combine CA - <your company name>in the list of certificates. -
Right click the certificate entry in the
Keychaintool. Click Info -> Trust and select Always Trust from the dropdown.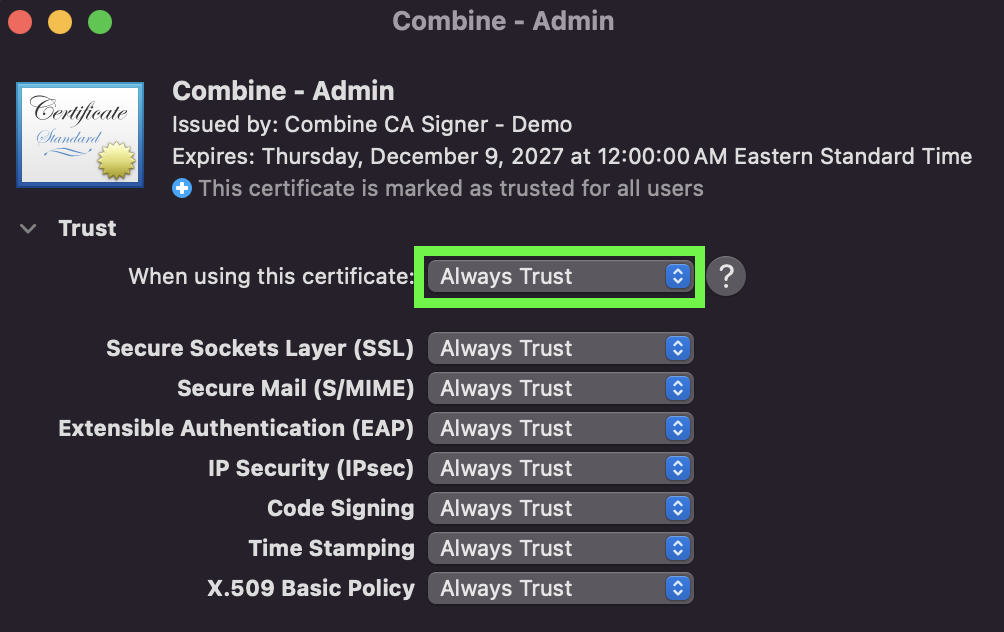
-
Install your Personal Certificate. Double-click on your Personal Certificate (
certificates/<user name>.p12in your Credential Package.) You will be prompted to enter the Personal Certificate password (certificates/<username>_password.txtin your Credential Package.) -
Confirm the import by entering your MacOS system password.
-
Right click the certificate entry in the
Keychaintool. Click Info -> Trust and select Always Trust from the dropdown.
If you have installed the certificates successfully, browse to the URL of your Combine Dasboard (see tap.txt in your Credential Package.) If the Combine Dashboard loads successfuly, then your Personal Certificate installation was successful!
Certificate Installation Troubleshooting
If you receive an error when attempting to authenticate to the Combine Dashboard, here are a few things to try to get you unstuck:
- Try hitting the Dashboard in an incognito window. Oftentimes even modern browsers like Chrome cache client-side ssl certs for a few days. If you've mistyped the password to either the your personal certificate or your local computer, the unsuccessful attempt is saved for a long time. An incognito window bypasses the cached state.
- Try deleting and reinstalling your personal certificate. The cert can become outdated if your Dashboard Admin(s) have rotated all the user certificates, especially if you have had Combine for a few years.
If not, please reach out to the team via slack or our email for more assistance. The team can attempt to log in with your personal certificate to determine whether it's an issue on your browser/network or the dashboard itself.
SSH Access via Bastion
NOTE: The Combine Team recommends you discontinue use of the Combine Bastion server and use EC2 Instance Connect or SSM Session Manager to access servers directly instead.
NOTE: As of Combine Version 3.13.12 the Combine Bastion server will be deprecated. It will be removed from Combine's management in Version 3.14.0 (meaning that existing Combine Bastion servers will not be destroyed but they will no longer be maintained by the Combine Team.) The Combine Bastion server will not be created for customers that start using Combine in Version 3.14.0 or later.
The Combine Bastion server is provided as a convenience to allow you to easily access resources deployed into a private subnet.
Access via EC2 Instance Connect / SSM Session Manager
To access the Combine Bastion server (usually used to access a server you have deployed into a private subnet) you may use the EC2 Instance Connect or Session Manager option through the AWS Console.
Browse to EC2 Dashboard.
Select the Combine Bastion server. (It is usually named "Combine-Bastion" but uses the default Name Tag pattern <ShardId>-<VPC Name>-Bastion unless you have specified a custom Name Tag.)
Click "Connect".
Choose either the EC2 Instance Connect or Session Manager options.
Click "Connect".
Access via Public IP / SSH KeyPair
To access the Combine Bastion server directly you may use an SSH Client.
The Combine Bastion's Public IP address is found in bastion.txt in your Credential Package.
The Combine Bastion's SSH KeyPair is found in Combine.pem in your Credential Packaage.
Combine Bastion Server Best Practices
-
The Combine Bastion is designed to be used only to access your private subnets, transfer files into the Combine environment, and similar tasks. It is not intended to be used to build or deploy a workload in the emulated region. It is NOT within the airgap layer. So actions taken on the Combine Bastion server are not regulated with the same rigor as the rest of the emulation.
-
The Combine bastion server is NOT persistent. It might be terminated and rebuilt during a Combine upgrade.
-
Please coordinate any necessary configuration changes to the Combine Bastion server with the Combine Support Team so they can ensure those changes are persisted during a Combine upgrade.